
Introduction
Recording drums in the studio is often one of the most challenging yet rewarding tasks for an engineer, the size and volume of the instrument and variety of sounds it can produce can make it a daunting prospect for anyone undertaking it for the first time. I have around ten years experience of recording drums and have developed several different working methods of which I am happy with but continually strive to change and improve. Throughout this tutorial I will offer some practical and artistic advice aimed at helping you first of all understand some basic principles of drum recording and secondly help you develop your own methods and approaches.
The Drum Kit
You can’t achieve a great drum sound with the wrong drum kit, that may sound obvious but in reality there are many factors in choosing the right kit for your recording. Having a clear idea of how you want the kit to sound from the start will greatly help you choose not only the kit but also the recording methods you employ. Preparation is crucial for a successful drum session; if the song suggests an old Motown drum sound for example then you will struggle if you have a brand new DW kit in a large reverberant room. If you feel the kit the drummer has is not right for the job then always hire or borrow anything that’ll improve the recording starting with the right snare! As with all recording getting the right instrument, recording space and equipment is essential for a successful session.
Drum kits come in all shapes and sizes and usually in various states of disrepair, as an engineer is very important to be able to get the most out of just about any kit. Fresh heads and careful tuning will always get the best out of a drum, some drummers will do this automatically before a session others will shudder at the thought. I personally like to get involved in tuning drums if I feel the drummer isn’t up to it, I recently found some great tutorials on YouTube that I thoroughly recommend (see links at bottom). A drum key, screwdriver and RTOM Moongels (dampening pads) are essential tools for getting the kit in tune and sounding right, always have these handy at a drum session.
There are lots of factors that affect the sound of a drum kit, when I’m recording I’ll maybe change several small things that I think will have the greatest overall impact in shaping the sound I’m after.
1. Remove the front skin of a kick drum for a tighter thump sound with little resonance or vice versa 2. Add or remove dampening from the kick drum to adjust resonance 3. Change the kick beater to affect the attack of the beater (felt, plastic, wood) 4. Tighten or loosen the snares 5. Add or remove dampening on all drums
If you are lucky you’ll be working with a great drummer who has got all of this covered himself and can tune the toms sympathetically to key of the song if not then don’t be afraid to get involved!
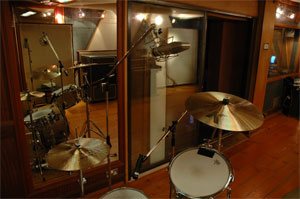
The Room
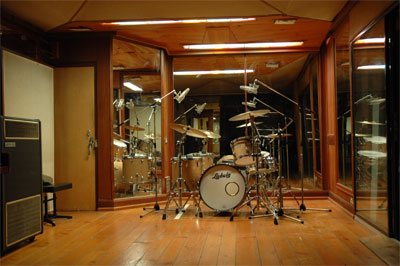
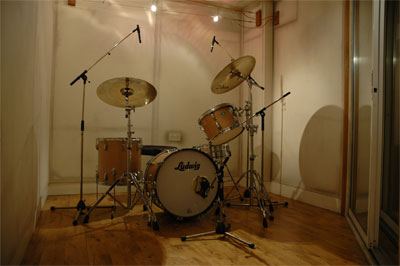
The room you set the kit up in will have a massive impact on how the recordings will turn out, for example if you want a big boomy rock sound don’t use a small dead booth, again it’s obvious but critical to consider for the overall result. Natural ambience will always help gel the sound of a kit together and create natural space without the need for artificial reverb, for this reason unless you are after a dead sound a largish room with reflective surfaces (brick, wood, stone etc) and high ceilings will be a good bet. Drum screens can help control ambience around the kit and allow you to record a fairly dry close sound whilst also allowing you to capture the full natural ambience of the room.
Many producers and engineers choose specific studios for their drum room. These hallowed spaces make recording drums a pleasure. London has a couple of these magic rooms found at studios like RAK, Abbey Road and of course Miloco’s own Garden Studio. In my opinion a great sounding drum room is far more important than an endless list of mics and outboard. Interesting sounding rooms can also add unique character to a recording, using a brick basement, stairwell or corridor should never be ruled out if appropriate and accessible.
Setting The Mics
Once you have a sympathetically tuned kit in a good room, which works for the tracks you are recording, you can start thinking about how to mic up your kit. I believe there are two main schools of thought when it comes to drum micing:
1. Capture the sound and balance of the kit as a whole using minimal micing. 2. Create a representation of each drum and cymbal to form an overall sound using multimicing.
Both of these approaches have their merit and should be selected and adapted to achieve the sound you are attempting to create. If for example you are recording a metal band and want a clearly defined, punchy and aggressive sound then a multimicing approach would be perfect. In contrast a minimal micing approach would be better suited for recording a jazz kit for example.
Multimicing can mean placing well over fifteen mics on a kit at once, this method clearly requires a large amount of equipment and a lot of time to adjust, here is an outline of a multimicing approach I might take for a big rock sound:
Kick In
Mic inside drum to capture the sound of the beater and general attack of the sound, suggestions include, D12, D112, RE20, basically a solid dynamic that preferably has a large capsule capable of reproducing low frequencies and not distorting at high levels.
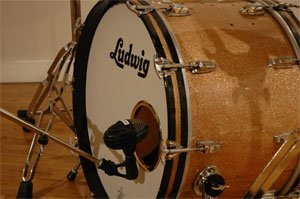
Kick Out
Mic on hole of the resonant head (if applicable) to add weight and roundness to the sound and provide more of a note, Neumann FET47 is the classic mic for the job but a U87 will do or any other LDC with a pad that won’t distort at high levels.
Kick Sub
Another mic on the outside such as a Yamaha Sub Kick or rewired NS10 cone will provide 808-style sub for your kick drum if needed. This is optional but usually worth taking even if not used.
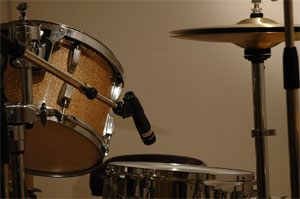
Snare Top
Mic the top of the snare to capture the main crack and tone. Start by placing the mic a couple of inches above the head facing into the centre, moving the mic will have a dramatic effect on the end sound so always experiment with this. If you have an overly ringy snare for example moving the mic will often help alleviate the worst overtones. I like the humble SM57 on snare top but many dynamics will work, Beyer 201 can be good as can the Sennheiser 441, don’t rule out SDCs either (as long as they have a pad!).
Bottom Snare
Mic the bottom of the snare to aid air and sizzle to the sound, blending the two snare mics can yield many different sounds when mixing. Again the SM57 is a favourite of mine but there are many options for this duty.
Toms
Micing toms is essential in this kind of setup and again experiment with positions, moving the mic will allow you to get the best balance between attack and weight and help you minimize spill from other sounds. I usually use either 414s (hyper cardiod mode with 20dB pad) or Sennheiser 421’s. 414’s offer a strong attack and good spill rejection and 421’s often just sound right!!!!
Overheads
There are numerous ways to set up overheads but in this kind of arrangement the most common would probably be by using a spaced pair of mics placed to offer a good spread of the whole kit (possibly one mic over the ride cymbal and another above a high rack tom). The height and width of the mics determine what they capture but essentially you are looking to get an overall picture of the kit with a focus on the cymbals. For a warm and full overhead sound you can’t beat Coles 4038’s or similar ribbon mics, as an alternative you could use SDCs such as Neumann KM84’s, which are bright and provide an excellent transient response.
Hi Hats
If you need a close hi hat sound then a SDC is perfect, an AKG 451 or KM84 will do a great job, you should look to balance the sound between the stick noise and overall tone of the cymbal.
Ride Cymbal
Again this is optional depending on the drum part, if you need to emphasise the bell of the ride for a certain section then placing an SDC close to the cymbal will help you when you come to mix the track.
Room Mics
Capturing the sound of the kit in the recording room helps to add space and depth to the sound and will often gel all of the individual kit mics together. Depending on the room I will usually use a spaced pair of omni LDCs such as 414s, experimenting here can often provide interesting and unique sounds, for example try recording a mono mic pointed at a wall or on the floor behind the kit etc.
Dist Mics
I always like to use a trashy mic set to pick up a whole kit sound which I then heavily limit and distort and blend to taste. This can add excitement and power to a recording and always sounds better than just distorting your drums after. Crystal mics such as the Shure DX520 (Green Bullet) are perfect but my personal favourite is the STC Ball and Biscuit. Ebay is perfect for picking up cheap lo-fi mics that give you a cool and distinct drum sound. The position of this mic varies depending on the player and part but usually I place it between the kick and snare about two feet from the kit.
Fine Tuning the Mics
When using so many mics it is essential that you thoroughly check the phase relationship of everything and make sure nothing is being cancelled out. Most preamps will have a phase reverse switch so you can use that to quickly flip the phase of a mic so see if it solves the problem, if it doesn’t then you’ll need to move the mic to alleviate the problem. Phase problems often make a particular drum sound weak compared to the others or less punchy often-just phase reversing one or two mics will make a big difference.

Minimal Micing
If you decide to use a minimal micing technique to record your drums then you are effectively looking to capture an overall balance of the kit with around 4 or 5 mics. This approach clearly requires less equipment and time but in many ways requires a better drummer and kit to make it really shine when compared to the multimicing approach. If your drummer plays the hi-hat extremely loud for example and out of balance with the rest of the kit with this method it will be difficult to really adjust that balance when you come to mixing. The sound achieved through minimal micing however can be natural, powerful and more realistic. Glyn Johns is seen as a pioneer of this technique and I believe he used it to great effect with Jon Bonham on many Led Zepplin tracks. More recently a variation of his technique has been called the, ‘Recorderman Technique’ there is a great video about this technique on youtube (see links at bottom).
Here is an outline of how I would approach a drum recording with less microphones:
Kick and Snare
One mic on the kick maybe just inside the hole (Fet 47 or similar) positioned to capture a good balance between the attack of the beater and the decay of the drum. One mic on the top of the snare set up as described above.
Overheads
This is where the main difference in setup occurs; the mics are setup in a non-symmetrical fashion. One mic is placed about six inches above the floor tom pointing at the snare and the other over the rack tom again pointing at the snare, ideally they should both be around two stick lengths from the snare centre. The mic above the snare should be panned to the left at about 9 o’clock and the other overhead to the right slightly wider.
Room Mics
Add a stereo room mic setup as described above if required.
Dist Mic
I always like to use a distorted mic for blending purposes but it is definitely optional!!!
Summary
Once you have a grasp of these basic principles for recording drums you can begin to experiment and try out your own ideas, compressing and EQing when recording offers some interesting options as does the use of guitar amps and pedals! Always put the best interest of the song first though, a great drum sound that doesn’t suit the track is completely useless.
Links
www.danalexanderaudio.com/glynjohns.htm
www.youtube.com/watch?v=Qxm3QunDjUs
https://www.youtube.com/watch?v=uJ9Unab1OzU&feature=related
www.youtube.com/watch?v=Ga8Q12mKYxI&feature=related
www.gearslutz.com/board/high-end/6803-pictures-miced-up-drum-kits-studio.html
Stay in the loop
Follow @milocostudios
Subscribe to Miloco News