
1. The Eternal Debate
It is clearly becoming more and more the case that engineers and producers are choosing to do the final stage of mixing directly from a computer, albeit running Protools, Logic, Cubase or indeed any of the other hard disk recording systems. Whilst this is technology readily available to most musicians working at home, it’s worth pointing out that the thing really making the difference is a great monitoring environment, and a professionally set up studio is always the best option.
The advantages of mixing in the computer are obvious. Clearly it is a lot more cost-effective than mixing on a conventional console, you can keep coming back and making small changes until you are happy and that is invaluable when dealing with producers / management and record companies who have become used to the luxury of making small changes right up to the point of the record being mastered.
The disadvantages however are often overlooked. Traditional board mixes often have a wider, warmer sound. It is very easy to over eq in the digital domain, and the mixes often have a brittle squashed quality with a lack of detail and colour (usually down to the final mix buss being rammed into a limiter). Analogue compression and EQ, whilst equally powerful, have a tendency to distort in a more sympathetic way.
The best option is often to use either an external summing box (there are a great deal on the market), or the best of both worlds, a combination of ‘in the box’ mixing and summing using a traditional desk. This way you can integrate all the analogue eqs and compression but with the power of ‘in the box’ mixing and at the same time benefitting from a controlled listening environment.
2. Basic ‘in the box’ Techniques
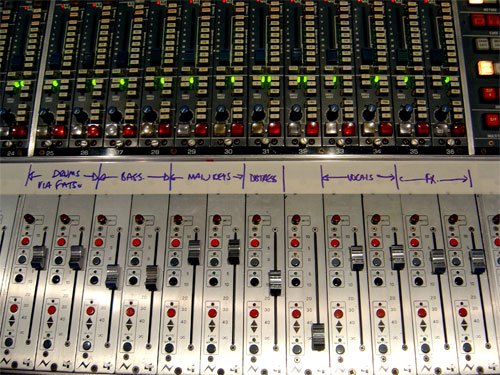
I find the best way to approach the mix is applying traditional techniques. I usually start by making stereo aux groups. One for the drums, maybe one for percussion, bass, guitars, keyboards, vocals, and misc effects. This way you can either stay in the box or output the stereo groups to a console. I also find it really useful to colour code the tracks because it makes it so much easier to find things.
I always like to get a general feel for the track first. It was always very easy when working on 24-track tape to push up the faders and get a rough balance to see what works and what doesn’t before pulling them all down and starting a mix. In the modern world you may be lucky and already have a balance going, or you may have a hundred audio files that make no sense whatsoever. In this case don’t panic, just go through them methodically using the grouping technique.
Like most engineers, I start with the drums. I will listen to all the sounds individually first, removing any problem frequencies and maybe choosing a few reverbs which I will output to the same subgroup. I try and get the bass drum, or component part of the bass drum, in a loop to a level leaving 10db of headroom on the master buss. Then feed in the rest of the sounds tailoring the EQs. At this point I may choose to add a little EQ and compression to the drum group. Sometimes if the compression is compromising the clarity of percussion and any other top end detail, I will set up a separate percussion group. I will probably also get a few fader rides going for the different sections of the song dropping elements in and out for the verse and chorus etc. Maybe In the process of listening to different combinations of sounds in isolation, I may have come across something to use for a certain section.
Then its on to the bass and getting that working well with the drums. But once I’m happy I will take the bass out and move on to the vocals, work out what space they are going to take up and how wide the bvs are going to be spread. Once this is working I will mute the vocals and move on to the main bulk of the music, whether guitar or synth led. The beauty of working with groups is that you can get them working as a unique sound and then tweak the group’s EQ to make space for other things, a bit like stem mixing at the same time. So, drums done vocals in, then the musical component, then bring the bass in last. Try bringing these elements in by turning down the group fader to zero then bringing it up until the point where it sits perfectly. This way you can get the main balance by only using say 8 stereo faders.
However, the devil’s in the detail and from this point on it’s down to getting the fader rides on the individual instruments right, to make the dynamic of the track come alive!
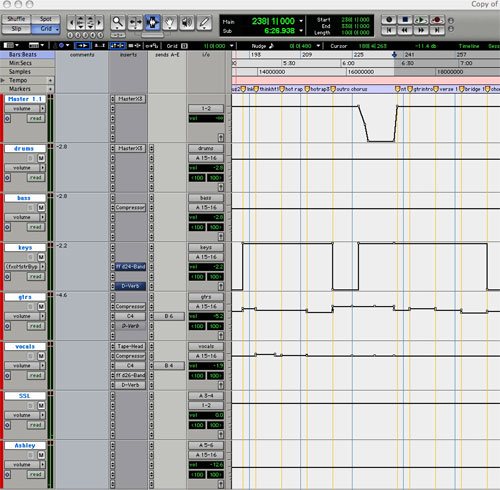
Master compression on the master buss is again a tricky issue and should be applied with care. You normally find there are some compressors you know will work, whether it’s a plug-in or an analogue one. Personally, I will have an idea from the outset what I’m going to end up using, so will strap that over the master buss from the outset, even if I turn the threshold right up so I know it won’t colour the sound once I’ve spent time on EQs. That doesn’t always work, but as long as the mixes are not sonic bricks and there’s a little headroom left for a mastering engineer then its usually ok.
When printing the mix, which is normally delivered for mastering as a 24bit interleaved Wav, make sure you listen to it back for artefacts, and particularly clicks. Once again, the beauty of using groups and aux inputs is that you can print mixes in real time with and without compression, as well as being able to print all the stem mixes in one hit (assuming you are not sharing reverbs) and then just export them as interleaved files.
Stay in the loop
Follow @milocostudios
Subscribe to Miloco News