
10 INPUT “What is the name of your Song? “, SONG$
20 PRINT “Let’s mix “; SONG$
30 INPUT “How many mix passes do you want? “, N
40 FADERLEVEL$ = “”
50 FOR MIXPASS = 1 TO N
60 FADERLEVEL$ = FADERLEVE$ + “OFFSET”
70 NEXT MIXPASS
80 PRINT FADERLEVEL$
90 INPUT “Do you want another level ride? “, A$
100 IF LEN(A$) = 0 THEN 90
110 A$ = LEFT$(A$, 1)
120 IF A$ = “Y” OR A$ = “y” THEN 30
130 PRINT “Let’s print the mix of “;SONG$
140 END
Ok, so that’s a badly-satirised version of the BASIC programming language, but to those people used to DAW-style automation, the SSL computer can be equally off-putting. Whilst there’s many ways to use the automation system, the majority of operations can be achieved with just a few basic (pardon the pun) commands.
This tutorial will refer to the VCA-based non-moving fader automation that Miloco has at The Yard and at Sofa Sound studios, but the basic principle is the same for SSL’s moving fader “Ultimation” system.
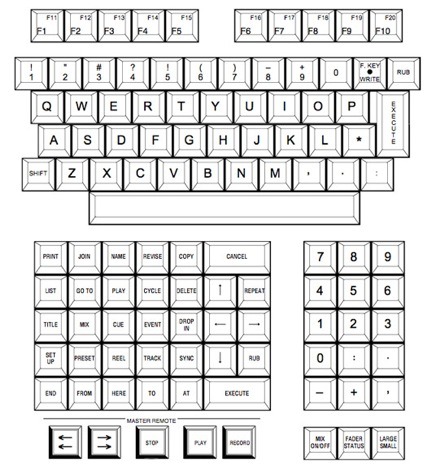
The SSL computer has 2 main sorts of keys – command keys and the regular QWERTY keypad. For the purposes of this guide anything in square brackets e.g. [COPY] is a dedicated key, and anything else e.g. SONGNAME is typed using the QWERTY keypad.
 Part 1 – Formatting a disk and Project Structure.
Most SSL computers these days use a 3.5″ floppy disk – although The Yard is still currently using the 8″ floppy – a good example of vintage digital technology at work! To begin, insert a new disk, and then type LABEL [EX] (using the QWERTY keypad as mentioned above, then pressing the “Execute” button). The SSL computer asks you what you want to format (F for floppy in The Yard, and M for mini-floppy at Sofa Sound), are you sure (type Y) and should it check the disk first (Y). When returning to a session, type LOAD [EX] to reload your floppy disk into the SSL computer.
The SSL computer deals in Reels, Titles, Mixes and Setups: Reel – the floppy disk itself. Created when you format a disk.
Title – your song. I’m not sure how many will fit on one disk, but realistically you’ll run out of disk space before you run out of song titles.
Mix – unlike the Neve automation, every time you finish a mix pass you need to save it manually, and it is saved under a different name. Older mixes can be returned to (if later mixes lose their way) or deleted (to avoid confusion or regain disk space).
To switch between current titles and mixes, type [TITLE] TITLE1 [EX] or [MIX] MIX1 [EX].
Setup – the Recall store for the console, which allows you to reset the console, and is accurate to 1/4dB on each control (apparently).
So – you’ve got a formatted disk, and now there’s a screen which shows you artist information.
To modify this – just type the first few letters of each item, and then the information you require.
E.g. to change the artist to Coldplay, type ART COLDPLAY [EX].
To view this information at any time press [LIST][EX].
In fact the [LIST] button can be used to view lots of things – [LIST][MIX][EX] to view mixes, [LIST][SETUP][EX] for setups, and so on. This is one example of how the SSL automation system does become logical… after some time!
 Part 2 – Beginning a Mix
Firstly, we need to set up a song, or in SSL speak a Title.
[NAME][TITLE] YOURSONG [EX] is the command to use. This will create a title beginning at the current timecode.
[NAME][TITLE] YOURSONG [FROM] hh:mm:ss[EX] will create a title from the timecode position you specify. Equally, you can modify the start time of the current title by typing [TITLE] YOURSONG [FROM] hh:mm:ss [EX].
So, you’ve got your song ready to go. The easiest way to start a new mix is to type [GOTO][TITLE][EX]. The timecode spins to your title start, the SSL beeps, displays *new mix* and waits for you. Put Pro Tools online (the SSL is traditionally always the master and Pro Tools has to slave to it) and pres [EX]. The faders are writing in absolute (red LEDs) (ie exact levels) and you should play your song through to the end.
Once your track has finished, press [END] to keep the mix. The SSL will ask you to name the mix – but pressing [EX] will autoname it, and is a lot more convenient than manually naming each mix.
Part 3 – Continuing the mix
Type [GOTO][MIX][EX]
The SSL will return to the start of the mix, the fader lights will go green to indicate Trim status, and again the SSL waits for you to press [EX], this time displaying “update mix”. Before execute is pressed, the faders are disconnected, and can be moved anywhere without altering the automation data saved – one of the benefits of a VCA-based system.
So – you could do as some engineers do, and reset all the faders to 0 – so that later when you’re writing fader rides, you are able to see which faders have been changed and which are static. At this point in time, you can also change the mode of some or all of the faders – pressing the button on each fader cycles from Trim (green LED) through Replay (no LED) to Absolute (red LED). This is useful if you want to reprint the level of a particular track all the way through the mix.
You can do this globally using the button marked [FADER STATUS].
Pressing [EX] now starts the mix running, and you’re able to do level rides and cut automation to the data. One way of working that I’d recommend for users new to the system is that of using the roll back function of the SSL transport to finetune levels.
For example, you get to the chorus of your song – you decide the guitar needs to come up a little. Whilst the chorus is playing, you experiment and find the perfect level for the guitar. Now, press stop on the SSL transport, and rewind back past the start of the chorus (beware! The Whizzer, which is a synchronisation box used in both The Yard and Sofa Sound, is very sensitive – the best way to rewind is to hold down the button instead of pressing once and releasing!). When you reach the desired timecode, press stop and then play. You’ll notice that the green lights have gone out, the SLL screen says “mix review” and the faders, if you move them, do not affect the audio.
This mode will continue until you reach the point where you initially stopped playback – upon which time they’ll drop back into Trim mode. However, by pressing [JOIN], you force the SSL back into Trim – and the faders join with the level difference you worked out for your guitar. So by pressing [JOIN] as the chorus starts, your guitar level will jump up to the new volume at the start of the chorus, and will continue at that level until you ride it down again, drop the fader out of Trim (by pressing it’s button) or by ending the mix.
This also demonstrates another detail of SSL automation – that you can’t “trim a trim”. That is, if you do a ride in Trim mode, then roll back and drop in using [JOIN], you’ll overwrite the move you just did. If you want to keep a ride and add to it or modify it, you’ll need to end the mix (which can be done at any point within the mix, without overwriting or cutting it short) and then start a new update.
 Part 4 – Ways of moving around your mix
The architecture of the automation system and the command line interface means it’s very easy to move around your mix. There’s several ways of doing this. Some examples are:
Use rewind and fast-forward (don’t forget to hold them down!) to locate the timecode position you want to go from, then type [GOTO][MIX][FROM][HERE] – the SSL will drop into update mix and wait for you to hit [EX].
Use the command [GOTO][MIX[FROM] hh:mm:ss [EX] – the SSL locates to the timecode, drops into update and waits.
By using Cues – as the song plays (maybe during your initial pass in absolute) type [CUE] V1[EX], pressing [EX] maybe a second or two before the verse starts. Then you can type [GOTO] V1 [EX] and the SSL will locate to your Cue marker and wait for the all-important [EX] command.
Part 5 – Saving a recall and miscellaneous information
Master Fader – the master fader can be treated like any other fader on the board. It doesn’t have its own dedicated fader button though, so the [FADER STATUS] button does double duty. Typing MF [EX] at any point switches this button from “fader status master” to fader button for the master fader – when it can be used to switch the master fader between absolute, trim and replay modes.
Level matching – if at any point you need to see the exact level of where the VCA of the fader is, pressing [MIX] whilst the mix is running switches the faders into level match mode. The LEDs will flash – flashing green means the fader needs to be moved upward to match it’s current level, red means move the fader downwards. When both LEDs are static, the fader is in the correct position, and if both are flashing, the cut button is in the wrong position.
Cut button automation – this tutorial has mainly focused on level automation, since much cut automation is now done within the DAW. However, sometimes cut automation must be dealt with on the mixing desk (due to noise issues with compression etc. The buttons can be automated along with the faders on the SSL – dropping a fader into absolute also drops the cut into absolute, and pressing a cut on it’s own will overwrite any automation underneath until the fader button is pressed, or the mix is ended. One thing to be aware of is that if a cut button is left pressed as the mix starts, it will write a cut throughout the track! So when returning to update a mix, make sure that all cut buttons are not pressed.
Recall – to save a snapshot of the SSL’s settings, type [NAME][SETUP] YOURNAME [EX]. The SSL will ask you to press the fader buttons for those faders set to “Independent” on the thumbwheel (more on this in part 2 of this guide) and then press [EX] again. If you have the main monitor on at this point, you’ll get treated to one of several lovely 80s graphics – “A Night in the Wood” (must try harder), “Day at the Beach” (ok) or “SSL Begbroke” (print the mix – it’s fantastic!).
Recalling the mix will be dealt with in the 2nd part of this guide.
Once you’ve got an idea of the basic terms and commands used with SSL automation, by far the easiest way to get to know it is to use it. Many engineers in the current climate avoid using desk automation, but in my opinion it’s one of the most tactile and interactive ways to breathe life into a mix, and as an assistant or trainee, being the person with in-depth SSL automation knowledge is a very good way to make yourself a valuable member of the studio staff.
Stay in the loop
Follow @milocostudios
Subscribe to Miloco News