
(A basic knowledge of microphone types, polar patterns and the way stereo is perceived in the human auditory system is assumed
Broadly speaking stereo mic’ing techniques can be put into 3 categories – Non-coincident, coincident and near coincident. (2 matched Microphones are used unless stated).
1. Non-coincident (Timing and amplitude differences)
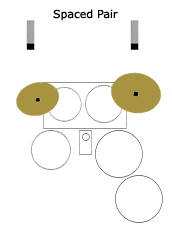
(i) AB (or spaced pair) – Two microphones in parallel are used at a distance 2ft or over apart to capture the stereo image. In the case of an orchestral session this could be as much as 30ft (or even farther) and omnis may be used. In the case of drum overheads the distance is more likely to be 2 or 3ft wide with cardioids being a more common choice. This probably the most commonly used technique as it is quick and simple to achieve and rarely gives a poor result.
The advantage of this technique is that it produces a wide stereo image. That flipside is that there could be “holes” in the centre of the image. This could be counteracted by (delay compensated) spot mics or…
(ii) Decca Tree – A triangular 3 mic configuration typically isosceles with a “base” of 2m and “height” of 1.5m with the centre mic closest to the source to fill in any gaps in the stereo image (the centre mic is, upon playback, collapsed equally into the L and R channels). This technique is seldom used nowadays as, with the introduction of more and more channels to record and mix on, spot mic’ing has proved more popular.
2. Coincident (Amplitude differences)
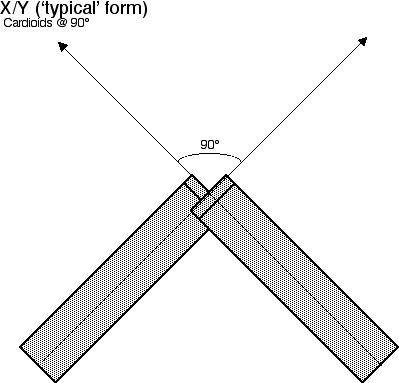
(i) XY – Cardioid mics configured with the capsules at 90 degrees to each other, ie both 45 degrees away from the centre of the sound source. The advantages of this technique is that phase problems are eliminated and there is more detail in the depth of field at the expense of width. I’ve found this method most successful on small percussive instruments eg tabla. When figure of 8 microphones are used this is known as a…
(ii) Blumlein Pair – This gives a more defined and separated stereo sound but also contains more of the room (negatively inverted). Probably for this reason it’s nowhere near as popular a choice as XY. We will not reject out of hand the work of Alan Blumlein as he also invented the amazing…
(iii) MS – A cardioid mic, M (Mid or Mono), faces the source while a figure of 8 mic is at 90 degrees capturing the S (side) information. The S information is then decoded by returning them down 2 channels, 1 is panned hard left, the other is inverted and panned hard right. The advantages of this method is that it has built in mono compatibility (the side information cancels upon summing) and controllable width via the S faders. The downside is that it needs decoding. This technique was at one time the broadcast standard when the audience had both mono and stereo sets. It remains to be seen whether this will still be the case as we switch to digital. I rarely see this technique in audio studios and I believe it’s much overlooked. Digital recording and manipulation means decoding the “S” signal is a relatively simple task but in an arena where time is in increasingly short supply it is easy to understand why this technique is rarely engineers’ first choice. If you have the time to experiment and you’re recording in a good sounding room you should definitely consider this technique.
3. Near-coincident (Timing and amplitude)
2 cardioid microphone capsules are configured between 17 and 30cm apart at an angle of between 90 and 135 degrees depending on the standard adopted:
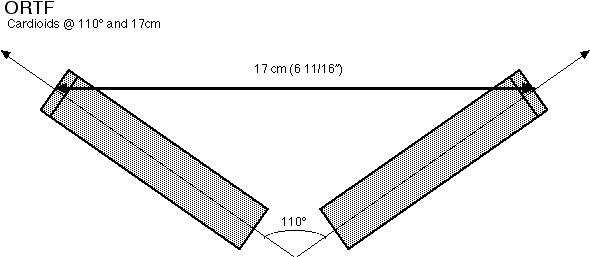
(i) ORTF (French Radio) 17cm apart, 110 degrees.
(ii) NOS (Dutch broadcasting) 30cm apart 90 degrees.
(iii) DIN (Germany) 20cm apart, 90 degrees.
(iv) RAI (Italy) 21cm apart, 100 degrees.
(v) Olson – 20cm apart, 135 degrees.
The further from the source the microphones are placed, the more room sound will be picked up and the less the bass response will be (due to polar response of cardioid mics). I’ve used this technique on larger percussive instruments eg congas, bell tree and also small “choirs” of say, 3-4 people. These techniques give a convincing stereo image when replayed over loudspeakers, conversely BINAURAL techniques seek to replicate the coding which occurs in the human auditory response and are convincing when played back on headphones but less successful through loudspeakers (due to double encoding). These techniques use timing, amplitude and frequency differences and include:
(vi) Jecklyn disc – 2 omni capsules 36cm apart divided by a circular frequency absorbing baffle of 2cm thickness and 35cm diameter
(vii) Dummy head – 2 omni capsules are mounted in the “ears” of a head made from frequency absorbing material. I’ve only used a dummy head once and, to be honest, wasn’t too impressed with the result even though we were in a large, good sounding wood-floored room although some swear by it.

Loudspeaker playback was improved by:-
(viii) Blumlein shuffler – 2 spaced omnis (20cm apart), divided by a baffle have their outputs fed into a circuitry device which converts time differences into amplitude differences. I mention this in passing as I’m yet to encounter this on a session although I suspect this work has lead to the development of stereo shufflers which work so well it can lead to a ghost stereo image outside of the speakers!
Stay in the loop
Follow @milocostudios
Subscribe to Miloco News